Posted on Leave a comment

Simple Ribbed Cowl – Free Pattern

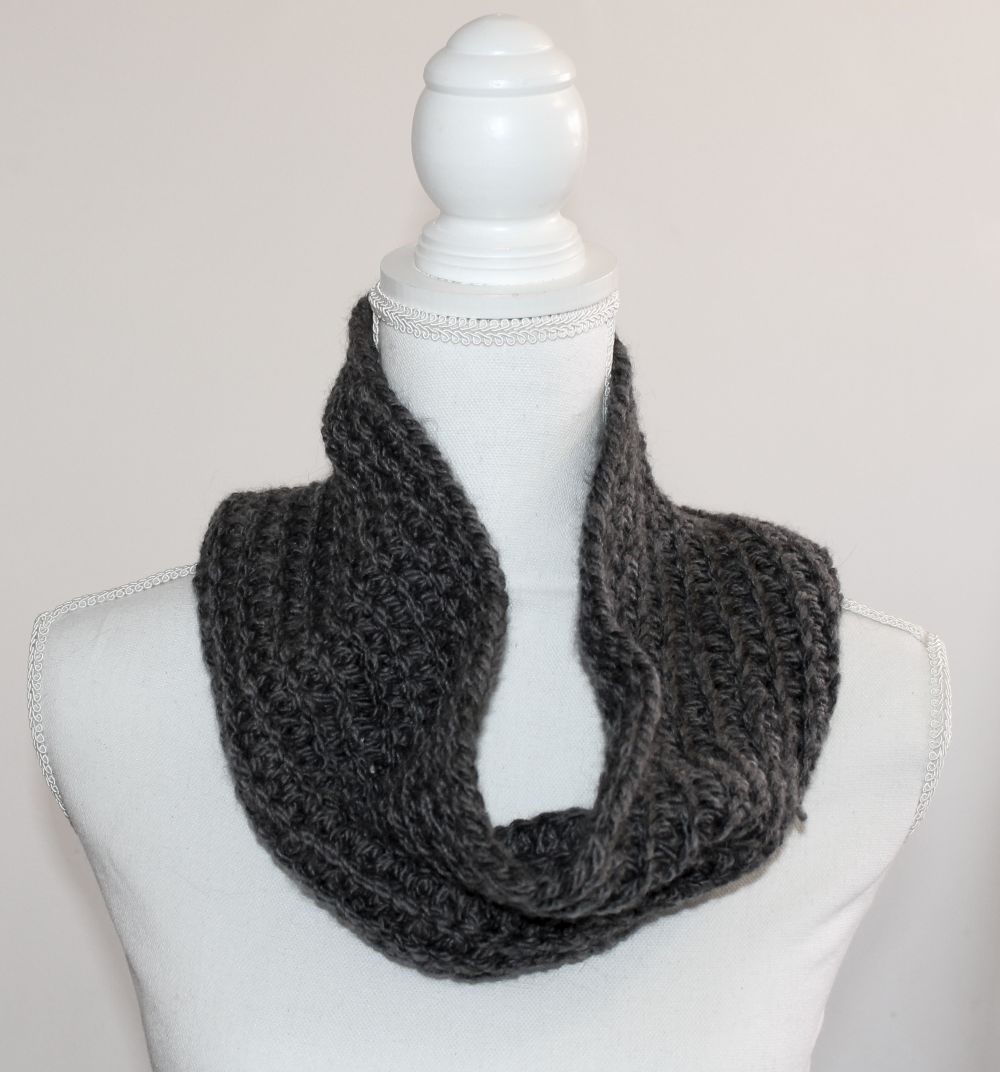
If you are after an easy to make and wear unisex project, the simple ribbed cowl is for you.

This last winter has been a shocker here in Sydney, with some really cold days, and especially cold mornings in which Ben (my other half) has to leave for work early in the morning on his motorbike.

I do not envy him those cold mornings, but I figured I could make him something to help. I have crocheted things for pretty much everyone else in my family, but not my other half, as what do you make the man who has everything?

Ben is a metal head from way back, and his wardrobe consists mostly of old faded black tour shirts, dark denim and more black, so no bright colours was a given. Plus I had to make sure that is was designed so as not to cause him trouble when riding down a dark and windy highway, hence the simple ribbed cowl was born.

The Patons Inca yarn is lovely and soft and so easy to work with, and being a wool blend I knew it would be lovely and warm. The cowl is constructed in joined rounds and I crocheted into the back loops only to give it some texture.

Simple Ribbed Cowl Pattern

Finished Size
63cm x 20 cm

Materials

  • Chunky Yarn – I used 2 balls of Patons Inca (50% Pure new wool, 30% acrylic, 20% alpaca, 50g and 58m) in colour 7019, but any chunky yarn will do.
  • 7mm Hook
  • Scissors
  • Yarn needle

Gauge
Gauge was not super critical for this project, just measure your first row of HDC before joining, if it’s around 63cm long, then you are good to go.

Skills

  • Foundation Half Double Crochet
  • Chain
  • Half Double Crochet
  • Slip Stitch
  • Working in the Back Loop only

Abbreviations Used

  • fhdc – foundation half double crochet
  • ch – Chain
  • hdc – Half Double Crochet
  • ss- Slip Stitch

Pattern Notes
If you are not sure on how to do a foundation HDC, you can find many tutorials on youtube, or you can just start with a ch and HDC into the chain.
Make sure to leave a good long tail of yarn at the beginning to assist in sewing fhdc round together

Instructions

Row 1: fhdc 70 or
chain 72 then hdc into 3rd chain from the hook and all remaining chains (70)
Join with a ss to the first HDC to form a circle, being careful not to twist your work.

Join with ss to first HDC, without twisting the row

Note: all hdc stitches from now on are done in Back Loops only

Rows 2-12: Ch1 (does not count as a stitch) hdc in Back Loop Only of the first stitch and every stitch around, join with ss to 1st hdc (70)

HDC in back loops only


Row 13:
 Ch1 (does not count as a stitch) hdc in Back Loop Only of first stitch and every stitch around, join with ss to 1st hdc (70)

Fasten off

Sew in your ends, and your simple ribbed cowl is complete.


After i finished the first one, i decided to experiment with different yarns and made the cowl in Moda Vera Fayette, which is a colour changing yarn. It is not a chunky yarn, more of a variable 8ply, but I still used the 7mm hook to make it nice and drapey. I love how this one turned out too.

I hope you love making this as much as I did, and please share your pictures if you do, would love to see them!

Love

Carmen

xoxo

Posted on Leave a comment

Crochet Easter Bunny Applique Pattern

With my love of making t-shirt yarn baskets, I knew I wanted to make Easter baskets this year. So along with some pretty pastel yarn to make them with, I searched for something else to add to them, and while trying to make something else entirely ( a flower I think), came up with this cute little crochet Easter bunny applique.

Crochet Easter Bunny Applique Pattern

These little bunnies would look good on baskets, as bunting, using smaller yarn would look so cute on Easter cards, Easter bonnets and even paper Easter baskets.

If you would like to make your own crochet easter bunny applique please find the pattern below.

Crochet Easter Bunny Applique pattern

What you need
t-shirt yarn
7mm crochet hook
yarn needle
scissors

Stitches
Magic Circle
Chain (Ch)
Single Crochet (SC)
Double Crochet (DC)
Slip Stitch (SlSt)

Bunny’s Body

Start with a magic circle

Round 1: 6 sc into the ring, pull tight and join to first sc with a SlSt

6 sc in a magic circle - crochet easter bunny applique
6 sc in a magic circle – crochet easter bunny applique

Round 2: Ch 1 (doesn’t count as a stitch), 2sc in each stitch (12) join with SlSt to first sc make sure to skip the ch 1 at the beginning of the round.

Easter Bunny Applique - Round 2
Easter Bunny Applique – Round 2

Bunny’s Head

3DC into the same stitch

Round 3: Ch 2, 3 dc into the same stitch

Bunny’s Ears

Round 4: Ch 3
Round 4: Ch 3

Round 4: Ch 3

Round 5: 1sc each in the 2nd and 3rd chains from the hook

Round 5: 1sc each in the 2nd and 3rd chains from the hook

SlSt into the side of the top of that 3rd dc then slip stitch into the bottom side of the same DC

SlSt into the side of the top of that 3rd dc then slip stitch into the bottom side of the same DC

Slip stitch into the next 2 sc of the circle (the ch and 3DC of the head were in the first stitch)
Cut yarn and pull through

Slip stitch into the next 2 sc of the circle

Then put your hook from back to front through the next stitch and pull the yarn end through to bring it to the back.

Lastly, sew in your ends and you have 1 bunny.

For added effect, glue on a little pompom for the tail, and you could even give him eyes and whiskers with black thread, or even googly or safety eyes.

I hope this made sense and I hope you have fun making him,  now hop to it!

Sorry, couldn’t help the bunny pun. Oh and here is a bunny I made using acrylic DK and a 3.5mm hook, just to show you that it will work with pretty much any yarn you want to use and the appropriate hook to go with it.

If you post any of your bunny’s on social media, please tag me @crochetbycarms, and they will be added to my bunny army.

Notes: In case you hadn’t noticed, yes I am a left-hander and so all my photos will reflect this. If you have any issues with my photos making things harder for you (I know how confusing trying to make sense of things going the wrong way is), please leave me a comment or send me a message and ill flip the photos around just for you.

Love

Carmen